


In pharma, disinfectant efficacy validation is the documented proof that your chosen disinfectants, at their actual in-use dilution and contact time, can control the real microflora on the real surfaces in your facility, as part of your contamination control strategy.
Here’s a clear, pharma-focused breakdown you can lift straight into a SOP, protocol, or article.
1. Why do we validate disinfectants in pharma?
- Regulators expect disinfectants used in cleanrooms to be validated for intended use, not just accepted based on supplier data.
- Guidance such as USP <1072> Disinfectants and Antiseptics, PDA Technical Report 70, and updated EU GMP Annex 1 all point to a systematic cleaning & disinfection program with demonstrated efficacy on site-specific organisms and surfaces.
In short: you must show that your disinfection regime really works in your cleanrooms.
2. Core principles
A compliant disinfectant efficacy/validation program should:
- Be risk-based and linked to the contamination control strategy (CCS).
- Use environmental isolates (from your EM program) plus relevant ATCC reference strains.
- Test disinfectants on representative surfaces (SS, epoxy, PVC, glass, acrylic, etc.).
- Consider clean vs dirty conditions (soil load / interfering substance).
- Demonstrate adequate log reduction for bacteria, fungi, and spores.
- Include both:
- In vitro lab testing (coupon / suspension tests), and
- In situ cleanroom studies with environmental monitoring and trending.
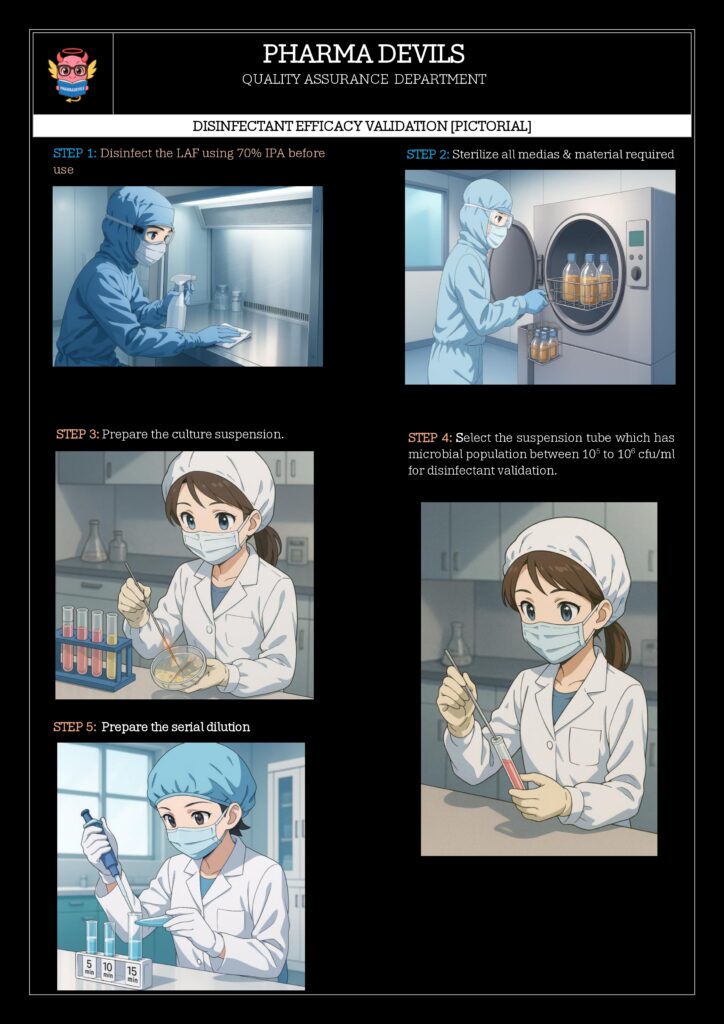
3. Stepwise approach to disinfectant efficacy validation
Step 1 – Define scope and risk assessment
- Areas: Grade A/B, C, D, warehouses, support areas.
- Surfaces: stainless steel, epoxy floor, glass, acrylic windows, PVC curtains, etc.
- Typical microflora and worst-case organisms based on historical EM data.
- Identify where sporicidal activity is critical (aseptic core, change rooms, etc.).
Step 2 – Select disinfectants and rotation
- Choose agents with different modes of action (e.g. QAC, alcohol, oxidizing agents like H₂O₂/peracetic acid, hypochlorite, sporicide).
- Define:
- Concentration / dilution and preparation (fresh, from concentrate, RTU).
- Contact time (wet time) — justified by lab data; PDA TR 70 stresses that surface must remain wet for the validated time.
- Set rotation including sporicide at a defined frequency (e.g., weekly or after interventions).
Step 3 – Select test microorganisms
Include a panel such as:
- Reference strains (ATCC)
- Gram-positive: Staphylococcus aureus, Enterococcus hirae
- Gram-negative: Escherichia coli, Pseudomonas aeruginosa
- Fungi: Candida albicans, Aspergillus brasiliensis
- Spores: Bacillus subtilis or similar
- Environmental isolates from your facility (dominant bacteria, moulds, and any problematic isolates).
Step 4 – In vitro efficacy (lab / coupon testing)
Usually based on USP <1072>, EN 13697, AOAC, or a hybrid approach:
Design:
- Disinfectant at in-use concentration and worst-case conditions:
- Clean and dirty conditions (organic soil: BSA/skimmed milk).
- Minimum and maximum contact times.
- Carriers (coupons): stainless steel, epoxy, PVC, etc., inoculated and dried with microorganisms, then exposed to disinfectant, neutralised, and recovered.
Typical log reduction criteria used in pharma (examples):
- Vegetative bacteria: ≥3–4 log₁₀ reduction
- Yeasts/moulds: ≥3–4 log₁₀ reduction
- Bacterial spores: ≥2–3 log₁₀ reduction
Standards differ (USP <1072>, EN 13697, PDA TR 70), so your URS/CCS must justify the chosen criteria.
Step 5 – In situ (field) disinfectant validation
Lab tests alone are not enough; you must show that the actual application procedure works in the cleanroom. STERIS AST+2American Pharmaceutical Review+2
Typical design:
- Choose representative rooms and surfaces (including worst-case areas).
- Perform baseline EM (viable settle plates, contact plates, swabs) before disinfection.
- Apply disinfectant via routine method (spray/wipe/mop) using trained operators.
- Perform post-disinfection EM at defined intervals.
- Compare:
- CFU counts before vs after.
- Profile of organisms (are typical isolates reduced/eliminated?).
- Demonstrate that routine use maintains counts within alert/action limits.
Step 6 – Documentation, SOPs, and training
- Validation protocol and report should include:
- Objective, scope, responsibilities.
- Risk assessment for each area.
- Disinfectant details (composition, supplier data, stability, storage, in-use expiry).
- Test methods, organisms, surfaces, conditions.
- Raw data, calculations, log reductions, EM trends.
- Deviations and justifications.
- SOPs for:
- Preparation and labelling of working solutions.
- Application technique (wiping pattern, volume, tools).
- Contact time and drying.
- Rotation strategy and sporicide use.
- Training records for operators performing cleaning/disinfection.
Step 7 – Requalification / periodic review
Revalidate or at least perform impact assessments when:
- New disinfectant or supplier is introduced.
- Change in surfaces, room design, or process.
- Significant EM trend shifts or recurring excursions.
- Change in dilution, contact time, or application method.
- At defined intervals (e.g. every 1–3 years), aligned with CCS.
One-line summary you can reuse
Disinfectant efficacy validation in pharma proves that your cleaning and disinfection regime, as actually used in the facility, consistently achieves required log reduction against real environmental microflora on all critical surfaces, supporting a robust contamination control strategy.